Shipping Estimate
USA
- USA
- CAN
- USA
- CAN
Ships within 48 hours · Estimated delivery Jul 7 - Jul 12
For Your Every Summer RSVP, with Code: SUMMER15
Description
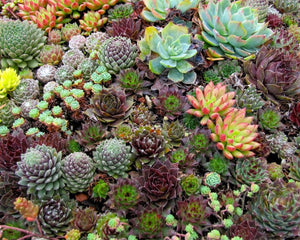
succulent babes 50 "Hippie Chicks" Succulent Sempervivum Flower Seeds – New Hill FarmsUp for sale is one pack of 50 "Hippie Chicks" Succulent Sempervivum (Sempervivum Hybridum) seeds. These succulents are a hybrid type that create a huge variety of small succulents that range from 2 to 4 inches in a variety of colors from greens to reds to purples. PLEASE NOTE: These Hippie Chicks succulents seeds are the smallest seeds we sell and you will receive approximately 50 seeds. Succulents require some extra steps for successful germination
Up for sale is one pack of 50 "Hippie Chicks" Succulent Sempervivum (Sempervivum Hybridum) seeds. These succulents are a hybrid type that create a huge variety of small succulents that range from 2 to 4 inches in a variety of colors from greens to reds to purples.
PLEASE NOTE: These Hippie Chicks succulents seeds are the smallest seeds we sell and you will receive approximately 50 seeds. Succulents require some extra steps for successful germination so please read the instructions below before purchasing.
We offer flat rate combined shipping on all orders, no limit on the amount or type of seed packets.
CULTURE
Soil temperature: 65 - 70 degrees fahrenheit
Germination lighting: Light required
Germination days: 21 days
Plant spread:4"-6"
Plant height: 2-4''
Plant type: Perennial
Maturation days: 365 days
A quick note about succulents. The names you see with Sempervivum Succulents are associated with the mix of colors they contain. Plain Sempervivum Succulents, also sometimes called "Hens and Chicks" Succulents, are mostly green. These "Hippie Chicks" succulents mix are a wider range of colors from green, to purple, to red, and all colors in between.
Succulents will grow outdoors in zones 3-10 but they dislike soggy soil conditions. It's best to start them in pots in a soil mixture of half coarse sand or vermiculite and half peat. For succulents we like to use a Tupperware type container with holes in the bottom and a translucent lid the help maintain moisture. You can also use 4" landscape pots that have holes in the bottom. These seeds are some of the tiniest seed we sell and are difficult to work with. Best way to handle them is to mix the packet with 1/4 cup of dry sand and use a shaker (like a spice bottle) to sow them. In the case of pots give each pot a quick shake, or if using 1020 trays you can apply the contents of one packet in the whole tray (using the shaker method). They require light to germinate so do not cover them and if you decide to direct sow them and not use the shaker method lightly dust with sand or vermiculite.
While germinating they do like their soil moist, but not soaking wet. We keep our Tupperware pot or landscape pot (with holes in the bottom) in a larger tray that always has about 1" of water in it. If you let your potting mixture dry out while succulents are germinating it means certain failure. We also loosely cover the pot with a translucent lid or plastic wrap to ensure the seeds don't dry out. Place your container under an artificial light source and keep it from getting too hot. We use flourescent shop lights, but you can also use LED grow lights. Don't use incandescent light bulbs, or place in direct sunlight, or you will generate too much heat.
These are slow to germinate, and once germinated grow slowly, so patience is required if you want to grow these. Do not expect them to germinate and create full size succulents in a few days.
Once they germinate, and are about 1/4" tall, you can remove the plastic wrap. You can also then add 1/4 strength liquid fertilizer like Miracle Grow to their water in the bottom tray (water from the bottom). When they are about 1/2" tall, and in the spring after your last frost, you can transplant them into your garden or into individual pots as they make great potted plants. If happy they will spread and create a unique dense ground cover in the garden.
You can visit our blog post of starting succulent seeds for more details:
https://newhillfarms.com/blogs/news/how-to-start-succulent-seeds
Shipping Notes
- Free Standard Shipping on $100+ Orders to the USA.
- Except Preorder products are shipped in 48 hours.
- Delivery to the USA:
- Standard Shipping : 3-10 business days
- If time is of the essence, please consider selecting expedited delivery for faster service.
Exchange/Return Notes
- We offer a 30-day return/exchange service after receiving.
- Final sale items are not eligible for returns or exchanges.
- To process your return/exchange, please contact us at [email protected]
- Please click here for more details>>> Return & Exchange Policy