Size:
4


Shipping Estimate
USA
- USA
- CAN
- USA
- CAN
Ships within 48 hours · Estimated delivery Jul 10 - Jul 15
 Promo Codes Available:
For Your Every Summer RSVP, with Code: SUMMER15
Description
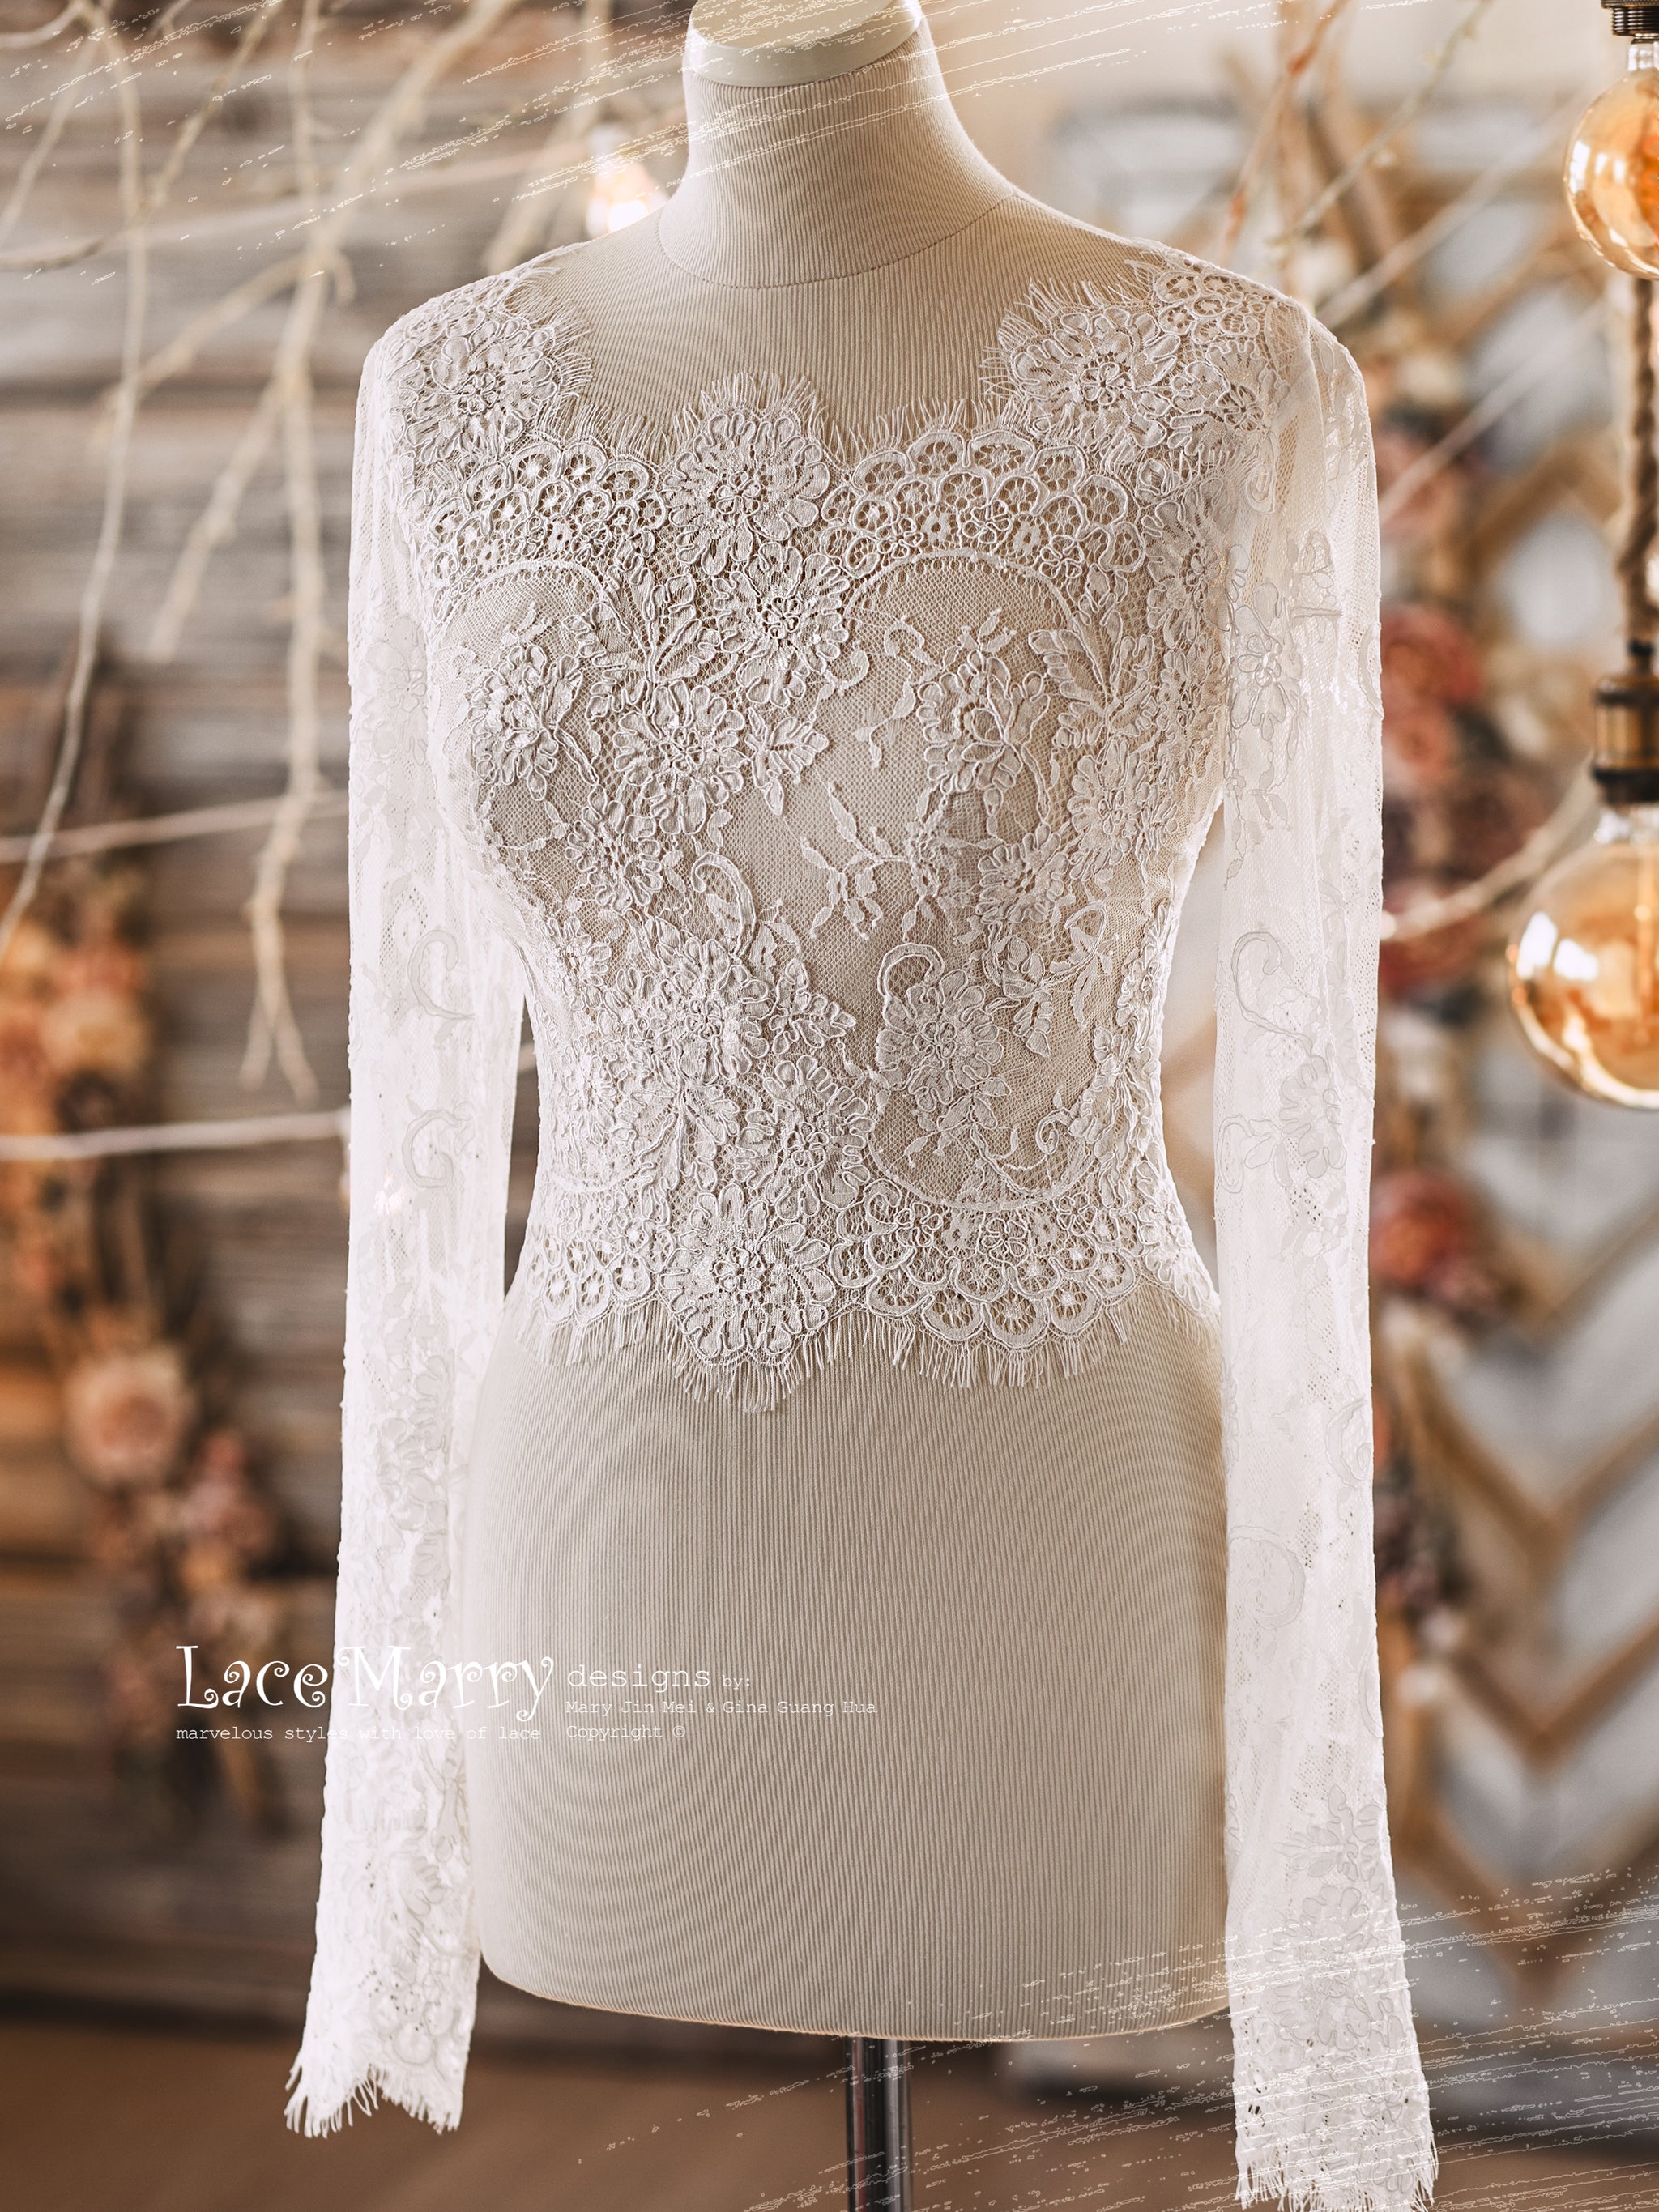
wedding dress topper long sleeve MAGNOLIA #1 / Romantic Bridal Lace Topper with Long Sleeves and Boat NDESCRIPTION Romantic Lace Bolero with Long Sleeves and Scalloped Boat Neckline. LACE TOP: MAGNOLIA #1 (SB53 7050 130)Romantic Lace Bolero with Long Sleeves and Scalloped Boat Neckline. Amazing Alencon Lace with Eyelash Scalloped Edge is so Chic so Romantic! Long Lacy Sleeves will provide an Exclusive look on your Arms. MAGNOLIA #1 is a Transparent piece and you can combine it with my VALERIE #9 BUSTIER as presented in the listing pictures. Or you can
- ◄DESCRIPTION
-
Romantic Lace Bolero with Long Sleeves and Scalloped Boat Neckline.
LACE TOP: MAGNOLIA #1 (SB53/7050-130)
°ºº°¨¨¨°ºº°
Romantic Lace Bolero with Long Sleeves and Scalloped Boat Neckline. Amazing Alencon Lace with Eyelash Scalloped Edge is so Chic so Romantic! Long Lacy Sleeves will provide an Exclusive look on your Arms. MAGNOLIA #1 is a Transparent piece and you can combine it with my VALERIE #9 BUSTIER as presented in the listing pictures. Or you can choose another style Bustier from my collection HERE.
❤ MATERIAL: Lace, Soft Tulle.
❤ COLOR: IVORY (color as in picture).
I work with Ivory Laces (Ivory is like Warm White).
If you want to change the color of Your Top to a Solid Color like FULL BLACK or FULL RED, then I would need to dye the original appliques or replace them with different ones which are available in BLACK or RED color.
If you would like to have Your Top Fully in BLACK or RED, please select Custom Color option from the menu and write your color in your order note.
❤ NOTE: The Lace Top in my pictures is Transparent. For Full Coverage and Complete Beauty, please consider to order Separate Bustier together with your Lace Top.
❤ CUSTOMIZATION: Please remark your Customization Request during check out. This can also be cleared up after you place your order.
❤ RUSH ORDER: I accept Rush Orders. Please contact me.
❤ PACKING: In order to save your shipping cost, your item will be packed tightly with water proof bag.
BUSTIER: VALERIE #9 (BU11/7200-20)
°º°¨¨¨°º°
Double Boned Sweetheart Neckline Bridal Bustier with adjustable Lace up Closure. It's very easy to adjust your Bustier for perfect fit! High Quality Design to provide coverage for your Lace Top and also to keep you in Shape. VALERIE #9 is a very stylish piece which is with extra boning design and you can wear it even under your daily clothing.
❤ MATERIAL: Elastic Crepe with Silk Satin Lining.
❤ COLOR: IVORY (color as in picture).
ELASTIC CREPE COLOR BOOK (COLOR #2 IS USED IN THE LISTING PICTURES)
NOTE:
If you don't write in your order note a different color number, then your bustier will come in original color as in the listing pictures.
❤ CLOSURE: Lace up.
❤ NOTE: The Plain Spaghetti Style Straps are removable and you can adjust the length with regulator on the back.
❤ CUSTOMIZATION: Please remark your Customization Request during check out. This can also be cleared up after you place your order.
❤ RUSH ORDER: I accept Rush Orders. Please contact me.
❤ PACKING: In order to save your shipping cost, your item will be packed tightly with water proof bag.
❤ ❤ ❤ ❤ ❤ ❤ ❤ ❤ ❤ ❤
LOVED THIS TOP OR SKIRT BUT WANT TO COMBINE IT WITH DIFFERENT STYLE OF TOP OR SKIRT?
THEN YOU MUST DEFINITELY SEE MY FOLLOWING COLLECTIONS:
SEE FULL COLLECTION OF SEPARATE SKIRTS HERE:
°º©©º°¨¨¨¨¨¨¨¨¨¨¨¨¨¨¨¨¨¨¨¨¨¨¨¨¨¨¨¨¨¨¨¨¨¨¨¨¨¨¨¨¨¨°º©©º°
SEPARATE SKIRTS COLLECTION
SEE FULL COLLECTION OF SEPARATE TOPS HERE:
°º©©º°¨¨¨¨¨¨¨¨¨¨¨¨¨¨¨¨¨¨¨¨¨¨¨¨¨¨¨¨¨¨¨¨¨¨¨¨¨¨¨¨°º©©º°
SEPARATE TOPS COLLECTION
SEE FULL COLLECTION OF BUSTIERS HERE:
°º©©º°¨¨¨¨¨¨¨¨¨¨¨¨¨¨¨¨¨¨¨¨¨¨¨¨¨¨¨¨¨¨¨¨¨°º©©º°
BUSTIERS COLLECTION - ◄COVERAGE OPTIONS
-
The Lace Top in my pictures is Transparent. For Full Coverage and Complete Beauty, please consider to order Separate Bustier together with your Lace Top.
- ◄MEASUREMENTS
-
CUSTOM MEASUREMENTS
My Dear Bride,
You can get your measurements at home. It's a very simple process.
Just please ask help of someone at home and follow my instructions.
If possible, you may also go to a professional tailor for assistance.
Please click on the image below to see or print my How to Measure Instructions:
Click to Download Full Instructions in PDF
NOTE 1:
If your style don't have sleeves, then you can skip the measurements #5, #6, #7, #8.
Depending on a particular style, I may need additional measurements. After you placed your order, I will inform you about this.
NOTE 2:
All my professional effort and care is to make Your Dress fit You well. However due to nature of custom orders, when You receive Your Dress You may need some alterations so please budget accordingly and plan for some alterations with help of a Local Tailor.
NOTE 3:
If your measurements are in Plus Size Range, then I may require additional Fee. This can be cleared up after you place your order.
STANDARD MEASUREMENTS
I suggest that you send me Your Custom Measurements to get a better fitting. But if somehow You are unable to get Your Custom Measurements, then please choose from my Standard Size Chart Below:
Click to Download PDF - ◄COLOR
-
Tips About Color
I work with Ivory Laces (My Ivory is like Warm White - It' not yellowish).
Because in my style and understanding, Ivory is the Best to give that warm Vintage effect to My Dresses.
If you want to change the color of Your Dress to different than the one shown in the photos, then please leave your note in your order note or contact me via Live Chat which you can find on the right bottom corner of any page and I will assist you with my comments.
For more information, Please see my following Help Links:
FAQ | Custom Orders | Contact - ◄REVIEWS OF THIS STYLE
Shipping Notes
- Free Standard Shipping on $100+ Orders to the USA.
- Except Preorder products are shipped in 48 hours.
- Delivery to the USA:
- Standard Shipping : 3-10 business days
- If time is of the essence, please consider selecting expedited delivery for faster service.
Exchange/Return Notes
- We offer a 30-day return/exchange service after receiving.
- Final sale items are not eligible for returns or exchanges.
- To process your return/exchange, please contact us at [email protected]
- Please click here for more details>>> Return & Exchange Policy
4.8 ★★★★★
Based on 670 reviews
Sort
Product Reviews
★★★★★ 4
pretty good banana plugs
Size: 5 Pack, Pattern Name: Banana Plugs
i bought these over 6 months ago and i just installed them to the front left and right floor standing speakers - sony ssf-7000 i have them for over 10 years hooked up to a yamaha 7.1 AVR.
alot of people have had trouble installing this - one single banana plug comes in 3 parts - the bottom and top (the banana plug tip) can be unscrewed.
what i did was tightened the top first (top being the tip of the banana plug) then unscrew the bottom off completely - make sure you have like 3/4" - 1" (depending on your gauge of wire) of exposed speaker wire that is straight - then thread it through the hole at the bottom up - i then rolled the exposed 3/4 - 1" exposed copper wiring into a ball that is bigger than the hole of the banana plug bottom piece so the wire doesn't fall back through where it came from. then i screwed on the top and middle piece back with the bottom piece - tightening it a bit so i know there's good contact. also make sure the tip is screwed in all the way as well as a double check. what you don't want to do is have the copper wire touch the threaded part of the bottom piece - the wire will cut off from the screwing action.
i plugged it into my sony speakers and it wasn't a real snug fit - a bit too loose to feel secure - it didn't seem to go all the way in - but it fit fairly well in my receiver. my intention was to use these banana plugs with my 2 channel set up but i decided to go pre-constructed mediabridge 12 AWG speaker cable instead - those fit my 2 channel set up on my receiver and elacs really snug and secure.
i tested it and it works fine. i didn't hear any loss of signal or any extraneous noise. none of my (14 awg?) wiring fell through the bottom and it sounds good. so no complaints there.
i bought 5 pairs - but i find that it is an odd number to include a package - even numbered pairs would be better.
anyway they seem constructed well - easy enough to install and they do work.
thanks for reading
WAS THIS REVIEW HELPFUL?YesReportShare
Reviewed in the United States on September 12, 2019
★★★★★ 5
High quality and robust
Size: 12 Pairs, Pattern Name: Banana Plugs
Easily the best plugs I've found at a reasonable price. Solid feeling with good quality and they look good with easy to see red/black labeling. The tips tend to unscrew too easily, but this is a non-issue when they are in use, just something you have to be careful not to lose when assembling. It's a bit tricky to spread the wire out evenly at the exact right length. If screwing the plug together is hard at all, go back and shorten how much wire you bend over the lip.
WAS THIS REVIEW HELPFUL?YesReportShare
Reviewed in the United States on June 16, 2025
★★★★★ 5
Solid banana clips
Size: 5 Pack, Pattern Name: Banana Plugs
Ah yes, I used these solid banana plugs to convert my wires. It’s pretty easy to set up once the wire housing has been stripped and really cleans things up nicely. I haven’t had any discernable hissing, noise problems, or connection issues.
WAS THIS REVIEW HELPFUL?YesReportShare
Reviewed in the United States on May 25, 2026
★★★★★ 3
Get the right wire guage
Size: 1 Count (Pack of 1), Pattern Name: Banana Plugs
I rate the banana plugs themselves 4 stars. They are everything I expected and work as advertised. It's the experience of assembly that I rate three stars. The way these work is -- you strip off the outer insullation of your wire and separate the two leads (positive and negative). Then you strip some length of insulation off the end of one of your leads, you unscrew the banana plug so that it separates into its respective base (lower) and contact (upper) halves, you slip the wire up through the base, you flare the copper strands of the wire and fold the individual strands over the very top of the base (about 1/16 of an inch) (taking care not to extend the strands over the threaded barrel of the base), then you screw the upper contact onto the lower base and voila, banana plug / wire assembly. It's not as complicated as it sounds. Go to the Monoprice website and watch their excellent instructional video.
Here's the thing though. While the assembly is not complicated, it is tricky, and if you don't get your proportions right the first or second or third time, you'll have to do it over. Fist of all, if your wire guage is relatively thin, like my 16-guage speaker wire, you'll find that the entire wire, insullation and all, will slip right through the base of the plug without butting up against the bottom of the base. If this is the case, then the wire is left to sort of flop around inside the plug and that has a kind of unfinished, amateur look and feel to it, whereas if the wire butts up against the bottom of the base, it has a solid, one-piece professional look. So, to my mind, there's a sweet-spot for wire guage that works best with this plug -- not too thin and not too thick. And since Monoprice has debunked the thicker-is-better myth (the quality of the copper is the real determinant), then you should feel free to get the wire guage that fits the plug.
Next -- and here's where it gets tricky -- once your copper extends beyond the top of the base, you'll need to limit this extension to about a sixteenth (no greatrer than a fourth) of an inch. Then you very delicately flare out the individual strands, in a 360- degree arc, and fold the strands over the top of the base. This takes a fair degree of manual dexterity, especially if the wire is "floating" inside the base and its travel is not stopped where the insullation meets the base. You'll have to hold the wire and base steady in the fingers of one hand, then flare out the wire strands with either your fingers or a suitable object (the working end of a ball-point pen worked for me) with the other hand. This one-sixteenth measure is important. If you extend wire strands beyond the top and over the threads of the base, you'll find that screwing the contact end onto the base is impossible and you'll need to start over. One or two strands is OK and almost unavoidable. In that case the screwing will catch but if you take a pair of pliers to it you can muscle through. By the way, you can avoid the whole mess by getting the open-screw type, which I'm sure will work just as well without any of the hassle of assembly.
Like anything else, if you do it a few times to make the mistakes and learn the tricks, then it will become second nature, and if you've already done that, then my review might seem overly fussy. In that case feel free to leave comments to help other readers.
WAS THIS REVIEW HELPFUL?YesReportShare
Reviewed in the United States on October 15, 2012
★★★★★ 5
Wish they came with instructions...
They are cheap and work great. They plug right into my Pioneer vsx521 receiver and my Paradigm Atom monitor speakers.
I wish they came with instructions, because it took me about 10 minutes to realize the bottom part unscrews in addition to the top part.
Here are my instructions for installation:
1) Unscrew the bottom part of this connector (the thin metal underneath the red/black ring).
2) Make sure the Banana Plug (which may be loosely screwed into the top part of the connector) is fully tightened down
3) Strip your wire tips to 3/8 of an inch (or just slightly under)
4) Run the first newly stripped wire end through the bottom part you removed in step 1, such that the stripped end of the wire is entering through the flat end and exiting through the smaller threaded end.
5) Leave about 1/8 to 3/16 of an inch of stripped wire hanging past the exit hole.
6) As evenly spaced as possible, bend the over-hanging wire strands over the exit hole (all around it, like a hat). If done properly, the wire should not fall out if you give it a VERY GENTLE tug.
7) Screw the top metal part (with the actual banana plug) back onto the bottom part. It may be difficult if your stripped wire is hanging too low. I've used a pair of pliers to grip the bottom part of the connector while I twist the banana plug side with my hand.
If done correctly, you should be able to put a lot of tension between the wire and connector without removing/damaging it.
UPDATE:
I just recently helped my dad install his 5.1 system without these... it sucked... This item (5 pairs of them in this case) and a good wire stripper can save you alot of pain (both physical and mental). The connectors on the back of his receiver are the kind where bare wire comes in from the side and then the connectors screw down (with a banana plug hole in the center which is where this product would come into play). I felt like a surgeon trying to get a bare wire end into the little slot, and then holding it there while I tighten the connector which is almost impossible since they are so close together...
GET THESE!
WAS THIS REVIEW HELPFUL?YesReportShare
Reviewed in the United States on February 8, 2012
recommand products
Designer Sexy Black Mini Dress | Sexy Mini dresses
20.63
Short Black Sequin Cocktail Party Dress by La Femme Black / 8
22.58
Spaghetti Straps Pink Cute Short Party Dress Formal Dresses SEA304 – SELINADRESS
21.68
Dusty Blue, Gold & Blush Short Corset Tulle Dress | Sparkly A-Line Mini Party Dress
22.54
Estee Long Sleeve Mesh Party Dress Black - US 12
25.14